Introduction
While convective boundary mixing effectively enhances the convective core, additional mixing processes taking place in the envelope of the star such as rotational mixing can likewise bring renewed fuel to the stellar core. Unlike the CBM, as you will have seen in minilab 1, the envelope mixing can also influence the surface abundances of the star provided that it is sufficiently efficient. More specifically, the surface abundance of nitrogen and helium will increase as excess nitrogen produced by the CNO cycle and helium ashes are transported from the core to the surface, while the surface abundances of carbon and oxygen will decrease. These surface abundances therefore also serve as tracers of internal mixing. One way to study this is to plot the surface abundances as a function of the rotation rate of the star in a so called Hunter diagram. One such diagram is shown below for a sample of B-type stars in the LMC.
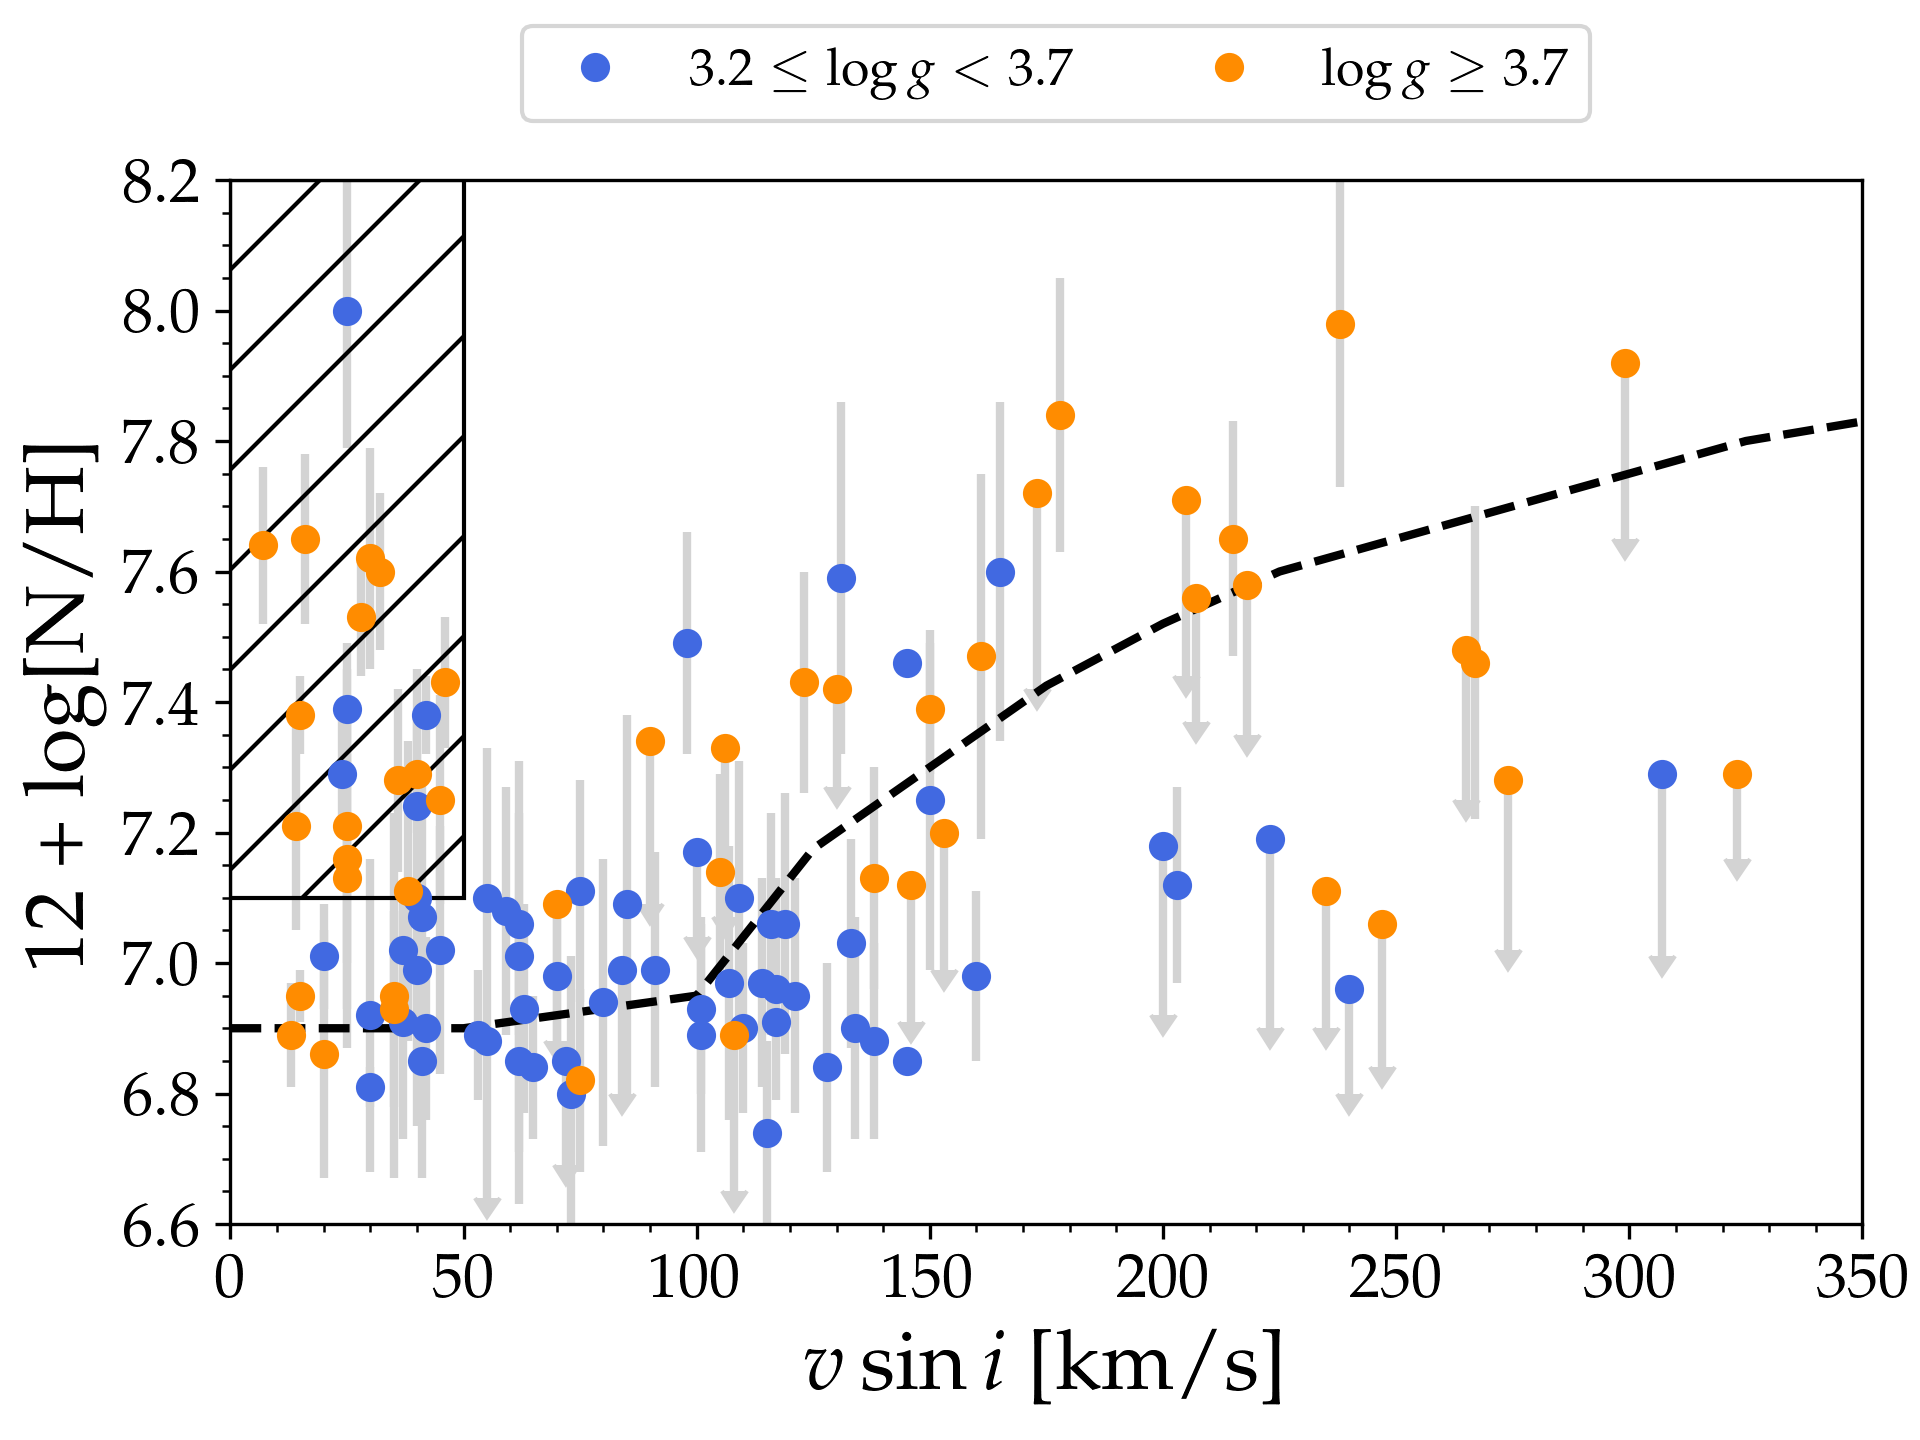
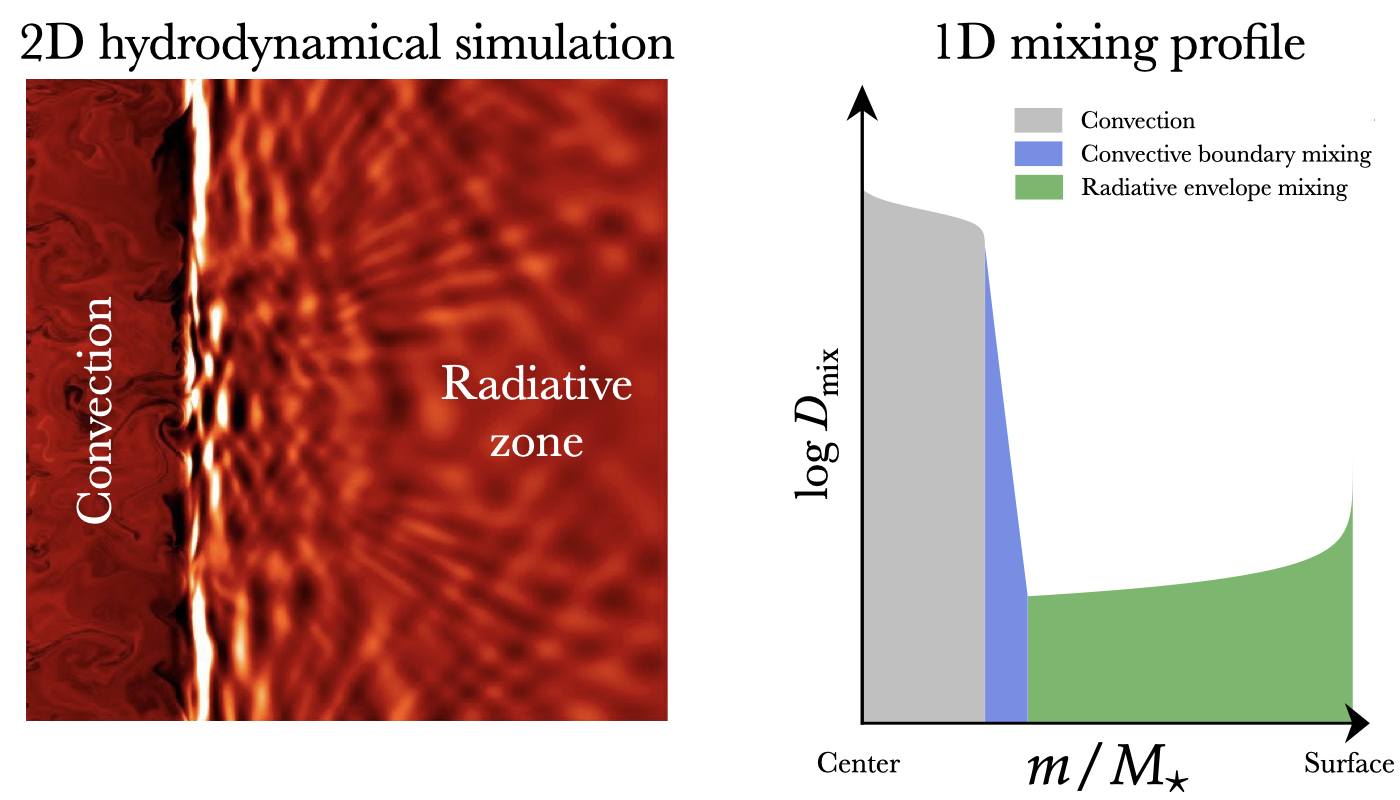
In the case of rotational mixing, the diffusive mixing coeffient for the envelope mixing $D_{\rm env}(r)$ is expected to increase for increasing rotation rates. As seen in the figure above, however, there is a sample of the B-type stars showing a surface nitrogen excess while having low projected surface rotation rates (hatched region). One possible explanation is that rather than rotational mixing, mixing from internal gravity waves (IGWs) generated by the convective core is very efficient here. Rogers & McElwaine (2017) demonstrated that IGWs are not only efficient at transporting angular momentum but also gives rise to an efficient mixing mechanism which takes the general form of
\begin{equation} D_{\rm env} (r) = D_{\rm env, 0} \left[\frac{\rho (r)}{\rho_{0}} \right]^{-n}, \end{equation}
where $D_{\rm env, 0}$ is the mixing coeffient at the transition from CBM to envelope mixing, $\rho_{0}$ is the corresponding density at this position, $\rho (r)$ is the density, and $n$ is a free parameter with typical values between $\frac{1}{2}$ and $1$.
This type of mixing is not included as one of the options in MESA, but there are neat ways that we can include it through run_star_estras.f90 using one of the other hooks without having to make changes to the MESA source code. In this maxilab we will do just that and explore how varying the parameters $D_{\rm env, 0}$ and $n$ change not only the period spacing patterns but also the surface abundances of our $4\,{\rm M}_\odot$ SPB star.
Aims
MESA: In this MESA lab you will learn how to implement your own mixing profile in MESA using the other_D_mix hook in run_star_extras.f90, as well as how to add additional output to your history.data file that is not available as a default option in history_columns.list.
Science aims: In this Maxilab, you will learn how different shapes on the envelope mixing profiles from internal gravity waves impacts both the period spacing patterns on SPB stars and their surface abundances.
Maxilab
Warning! These MESA labs have been put together with both low time and spatial resolution for the sake of having the models be completed within a sensible timeframe for the summer school. Before any of these steps or result can be used in any type of actual science case, carrying out a convergence study is crucial!
Minilab 2 solution: download
Maxilab solution: download
For this Maxilab we will now start digging into our run_star_extras.f90 file and make changes both to the MESA output as well as change the mixing profile used in the radiative envelope. Once again, we will start by copying and renaming our Minilab 2 work directory. If you were unable to complete Minilab 2, then you can download the solution from here.
cp -r SPB_minilab_2 SPB_maxilab
cd SPB_maxilab
./clean && ./mk
Also, delete the current contents of your LOGS directory to avoid confusion with previous models from minilab 2.
If you worked on the bonus exercises in minilab 2, change both your inlist_project and inlist_pgstar files to make sure that mesh_delta_coeff = 1.0, time_delta_coeff = 1.0, and that the associated Profile_Panels1_file_prefix,
filename_for_profile_when_terminate, and log_directory parameters are changed accordingly.
Now if you have a look at your run_star_extras.f90 file inside src you should see that it is fairly empty
! ***********************************************************************
!
!   Copyright (C) 2010-2019  Bill Paxton & The MESA Team
!
!   this file is part of mesa.
!
!   mesa is free software; you can redistribute it and/or modify
!   it under the terms of the gnu general library public license as published
!   by the free software foundation; either version 2 of the license, or
!   (at your option) any later version.
!
!   mesa is distributed in the hope that it will be useful,
!   but without any warranty; without even the implied warranty of
!   merchantability or fitness for a particular purpose.  see the
!   gnu library general public license for more details.
!
!   you should have received a copy of the gnu library general public license
!   along with this software; if not, write to the free software
!   foundation, inc., 59 temple place, suite 330, boston, ma 02111-1307 usa
!
! ***********************************************************************

      module run_star_extras

      use star_lib
      use star_def
      use const_def
      use math_lib

      implicit none

      ! these routines are called by the standard run_star check_model
      contains

      include 'standard_run_star_extras.inc'

      end module run_star_extras
All it is really doing right now is reading the contents of the standard_run_star_extras.inc file located in the $MESA_DIR/star/job directory. When we want to make changes to the run_star_extras.f90 setup, the first step is to copy the contents standard_run_star_extras.inc into our run_star_extras.f90 file rather than modifying standard_run_star_extras.inc.
Task 1
Replace the line include 'standard_run_star_extras.inc' in run_star_extras.f90 with the contents of $MESA_DIR/star/job/standard_run_star_extras.inc. Then do a ./clean and ./mk in your working directory (not in the src directory) to check that everything is working as it should.
If in doubt, your new run_star_extras.f90 should look like this.
Whenever we make changes to run_star_extras.f90, we have to use ./mk to make sure that the new changes are included in our MESA runs. Doing this often will make it easier to identify the source of any errors associated with our changes to run_star_extras.f90 that might pop up when we try to recompile our MESA work directory.
When we want to make changes to different physical or numerical aspects of MESA, the various other hooks located in $MESA_DIR/star/other directory makes it easy to do so inside run_star_extras.f90 without having to directly make changes to the MESA source code. It also allows us to do so, without having to apply such changes to all future MESA projects that we do using our installed MESA version. Instructions on how to use these other hooks are given in the $MESA_DIR/star/other/README file. Here we will walk you through how to make changes to the internal diffusive mixing profile using the other_d_mix.f90 hook. Let’s start by having a look at what this file looks like.
      module other_D_mix

      ! consult star/other/README for general usage instructions
      ! control name: use_other_D_mix = .true.
      ! procedure pointer: s% other_D_mix => my_routine


      use star_def

      implicit none

      contains


      subroutine null_other_D_mix(id, ierr)
         integer, intent(in) :: id
         integer, intent(out) :: ierr
         ierr = 0
      end subroutine null_other_D_mix


      end module other_D_mix
As you can see, the other_d_mix.f90 file itself contains some information on what we need to do to include the other_d_mix hook in our MESA runs, but it doesn’t actually tell us which parameter we need to modify using the other hook to change the mixing profile. We will get back to this parameter later and focus now on including the other_d_mix hook.
Task 2
Copy the subroutine null_other_D_mix from other_d_mix.f90 and place it right after the line end subroutine extras_controls in your run_star_extras.f90. Rename the null_other_D_mix subroutine to IGW_D_mix. Do ./mk to make sure you didn't make any mistakes.
Next we need to tell MESA to use our new subroutine IGW_D_mix.
Task 3
In inlist_project add the line use_other_D_mix = .true. under the &controls section. In run_star_extras.f90 add the line s% other_D_mix => IGW_D_mix at the end of the extras_controls subroutine. Then compile (./mk) and run (./rn) MESA. Does anything happen to your mixing pgstar window?
Currently, nothing new is actually happening to the mixing profile in MESA because we haven’t asked MESA to change it yet. This makes it difficult to tell if MESA is actually calling our new subroutine IGW_D_mix. To check this, we can add a print statement to IGW_D_mix.
Task 4
Add the line write(*,*) 'I am using IGW_D_mix' to your IGW_D_mix subroutine inside run_star_extras.f90. Recompile and run MESA, then check the terminal output to see if the line 'I am using IGW_D_mix' starts to show up.
Now that we know that MESA is actually calling our IGW_D_mix subroutine, we need to figure out which parameter we have to modify to change the mixing profile. Figuring this out is not always straightforward if we only go by the information available inside the other hooks, and may require some digging into the MESA setup. The name of the subroutine null_other_D_mix inside other_d_mix.f90 does give us the hint that it might be called D_mix. Let’s try to see if this is a parameter that actually exists in MESA. Note that to get back to the previous directory that you were in, you can use the command cd - in the terminal.
cd $MESA_DIR
grep -rI D_mix star/private
When typing in these commands, you should eventually see the following output
...
star/private/mix_info.f90:  s% D_mix(k) = 0d0
star/private/mix_info.f90:  s% D_mix(k) = s% conv_vel(k)*s% mixing_length_alpha*s% Hp_face(k)/3d0
star/private/mix_info.f90:  s% cdc(k) = cdc_factor(k)*s% D_mix(k)
star/private/mix_info.f90:  s% D_mix(k) = s% mlt_D(k)
star/private/mix_info.f90:  if (s% set_min_D_mix .and. s% ye(nz) >= s% min_center_Ye_for_min_D_mix) then
star/private/mix_info.f90:  if (s% D_mix(k) >= s% min_D_mix) cycle
star/private/mix_info.f90:  if (s% m(k) > s% mass_upper_limit_for_min_D_mix*Msun) cycle
star/private/mix_info.f90:  if (s% m(k) < s% mass_lower_limit_for_min_D_mix*Msun) cycle
star/private/mix_info.f90:  s% D_mix(k) = s% min_D_mix
...
As seen in the output above, there is indeed a parameter in MESA called D_mix that we should be able to access using the star_info pointer s%. Remember that you can look up the variables contained in the star_info structure by searching the files contained in $MESA_DIR/star_data/public. For quantities that vary throughout the star, the corresponding variable in the star_info structure is an array where each element corresponds to a zone in the star. You can think of each zone as being a shell around a given radius in the star. So for example s% T(100) would give the temperature of the 100th zone, whereas s% r(100) would give the radius of the 100th zone. The total number of zones of the star is stored in the variable s% nz. MESA stores the zones are stored from surface to center, so in the case of D_mix, s% D_mix(1) is the surface value of D_mix and s% D_mix(s% nz) is the center value.
Let’s try to use this in our IGW_D_mix subroutine and change the diffusive mixing coefficient to be some fixed value throughout the star. We declare the variable s using the line type (star_info), pointer :: s. To access the data stored in the star_info structure during a run we have to include the line call star_ptr(id, s, ierr). We want to set s% D_mix for every part of the star. We can do this by using a do to iterate over an integer k, which we have to declare at the beginning of the subroutine.
Putting everything together your IGW_D_mix subroutine should look something like this:
      subroutine IGW_D_mix(id, ierr)
         integer, intent(in) :: id
         integer, intent(out) :: ierr
         type (star_info), pointer :: s
         integer :: k
         ierr = 0
         call star_ptr(id, s, ierr)
         if (ierr /= 0) return

         write(*,*) 'I am using IGW_D_mix'

         do k=1, s% nz
            s% D_mix(k) =
         end do

      end subroutine IGW_D_mix
Task 5
Implement the changes to your IGW_D_mix subroutine listed above and set the diffusive mixing coefficient D_mix to be 104 throughout the star. Recompile and run MESA. What happens to your pgstar mixing window?
At this stage, your pgstar mixing window should look like this:
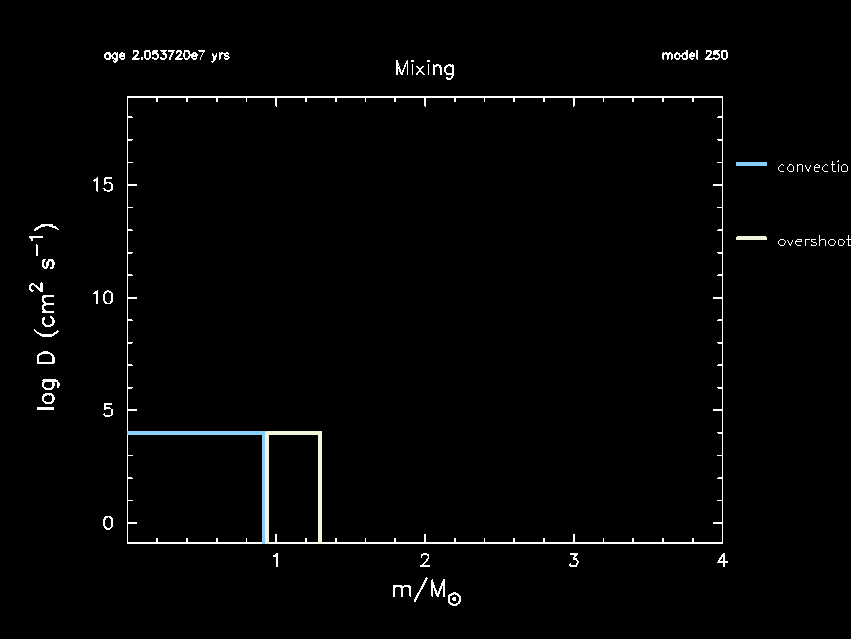
Currently, it looks like the diffusive mixing coefficient is only being changed inside the convective core and the overshooting region, and is now constant in both regions. Let’s double-check if anything is happening to the profile in the radiative envelope.
Task 6
If you haven't done so already in bonus exercise 1 of Minilab 2, then copy profile_columns.list from $MESA_DIR/star/defaults/ to your SPB_maxilab work directory. This file works like the history_columns.list that we modified in Minilab 1. Make sure that brunt_N2,
brunt_N2_structure_term, brunt_N2_composition_term, and log_D_mix are included as output. Then add the following to inlist_pgstar:
Profile_Panels1_win_flag = .true.
Profile_Panels1_num_panels = 3
Profile_Panels1_win_width = 6
Profile_Panels1_win_aspect_ratio = 1.8
Profile_Panels1_ytop = 0.95
Profile_Panels1_ybot = 0.1
Profile_Panels1_xright = 0.8
Profile_Panels1_xleft = 0.2
Profile_Panels1_yaxis_name(1) = 'brunt_N2'
Profile_Panels1_other_yaxis_name(1) = ''
Profile_Panels1_yaxis_name(2) = 'brunt_N2_structure_term'
Profile_Panels1_other_yaxis_name(2) = 'brunt_N2_composition_term'
Profile_Panels1_yaxis_name(3) = 'log_D_mix'
Profile_Panels1_other_yaxis_name(3) = ''
Profile_Panels1_file_flag = .true.
Profile_Panels1_file_dir = 'png'
Profile_Panels1_file_prefix = 'profile_panels1_1.0mdc_1.0tdc_'
Profile_Panels1_file_width = 12
Profile_Panels1_file_aspect_ratio = 0.75
As a reminder you can adjust Profile_Panels1_win_width and Profile_Panels1_win_aspect_ratios to change the size of the plot on your screen. Your Profile_Panels1 pgstar window should look something like this:

When you now run MESA, you should see that although nothing seems to be happening in the envelope according to the pgstar mixing window, then the mixing profile is indeed constant throughout the star. In other words, MESA is doing what we are telling it to do. This is because our ‘‘new’’ mixing profile has not been assigned a mixing type. For an overview of what different types are available, have a look at $MESA_DIR/const/public/const_def.f90.
...
! mixing types
! NOTE: some packages may depend on the order
integer, parameter :: crystallized = -1
integer, parameter :: no_mixing = 0
integer, parameter :: convective_mixing = 1
integer, parameter :: overshoot_mixing = 2
integer, parameter :: semiconvective_mixing = 3
integer, parameter :: thermohaline_mixing = 4
integer, parameter :: rotation_mixing = 5
integer, parameter :: rayleigh_taylor_mixing = 6
integer, parameter :: minimum_mixing = 7
integer, parameter :: anonymous_mixing = 8  ! AKA "WTF_mixing"
integer, parameter :: leftover_convective_mixing = 9
...
All of these integer values for the different mixing types are contained within the s% mixing_type(:) parameter. In other words, a region where s% mixing_type(k) = 1 has convective mixing. For now, let’s set the envelope mixing to correspond to the minimum mixing, i.e. s% mixing_type(k) = 7. To do so, we first have to activate the minimum mixing in MESA.
Task 7
In inlist_project set the parameter set_min_D_mix = .true. and tell MESA to use 0.1 as the minimum diffusive mixing coefficient. Make sure that mixing_type is included as a profile output, and include it in inlist_pgstar as Profile_Panels1_other_yaxis_name(3). Then run MESA.
Hint
The parameter used to set the minimum mixing value is called min_D_mix.
You should now see the envelope mixing, i.e. minimum mixing, appears as an orange line in your pgstar mixing window.
If in doubt, your inlist should look something like this, your inlist_pgstar should look like this, and the subroutine IGW_D_mix should look like this. If you’ve gotten stuck feel free to copy and paste these intermediate solutions.
So far we have been completely overwriting the mixing profile throughout the star to a constant value, even inside the convective regions. So even though we are telling MESA to do something silly, it is still running and trying to find a solution! What we want to do is only change the mixing profile in the radiative envelope, i.e. avoid regions where we have convective mixing and overshoot mixing. We can do this using an if statement
In Fortran, if statements are written in the format
if ((one condition) .and. (another condition)) then
    Do something
endif
You can also use such if statements to exit a do-loop once a condition has been met
do k=1, s% nz
    if (a condition) then
        Do something
        exit
    endif
end do
Fortran has three logical operators: .and., .or., and .not.
Additional useful comparison operators are given in the table below.
| Condition | Fortran text form |
Fortran symbol form |
|---|---|---|
| equal to | .eq. |
== |
| not equal to | .ne. |
/= |
| greater than | .gt. |
> |
| less than | .lt. |
< |
| greater than or equal to | .ge. |
>= |
| less than or equal to | .le. |
<= |
Knowing these will be useful in the following steps as well and whenever you want to add things to your run_star_extras.f90 in general.
Task 8
Modify your IGW_D_mix subroutine to only change the mixing profile when no convective or diffusive overshoot mixing is happening. You can do so using an if statement inside your do loop.
Hint
Rember you can use s% mixing_type(k) to determine if/what type of mixing is occurring. A value of 1 corresponds to convective mixing, and a value of 2 corresponds to overshoot mixing. So to apply changes to the envelope of the star we need to check that s% mixing_type(k) doesn't equal 1 or 2.
Notice that right now there is a discontinuity in our mixing profile when we go from overshoot to minimum mixing.
This discontinuity around a problem.
Before we deal with this, feel free to pause, stretch a bit, and drink some water if you need to. The next two tasks are tricky so check in with your energy levels and remaining time to decide what difficulty level feels right for you:
I’m up for a challenge: try to implement the procedure described in the text without looking at the task or the hint
Just get me started: The task gives a suggested series of steps
Walk me through it: The hint details how to implement each suggested step
Show me how its done: Jump directly to the solutions below
We want to get rid of this discontinuity by modifying our IGW_D_mix subroutine to automatically change the diffusive mixing coefficient to 104 when the original diffusive mixing profile drops below this value, which we’ll call $D_{\rm env, 0}$. To accomplish this, we need to find the first zone number, which we’ll call k0,r where D_mix is less than or equal to $10^4$ when going from the core to the surface of the stellar model. A reminder that this is backward of how MESA indexes arrays, where 1 is the surface and s% nz is the center. We also want to make sure that we aren’t overwriting any subsurface convection zones that might show up, so we will only modify s% D_mix in regions with no convection.
Additionally, it would also be nice to be able to change this value, $D_{\rm env, 0}$, from the inlist, rather than having it hard coded in run_star_extras (which requires us to re-compile MESA every time we make a change).
Task 9
To modify the IGW_D_mix subroutine in run_star_extras.f90 follow these steps:
1. Declare the D_env_0 parameter
2. Parameterize the D_env_0 using x_ctrl(1)
3. Declare the k0 parameter
4. Identify the value of k0
5. Iterate from the surface of the star to k0 and change s% D_mix(k) the mixing profile only when there is no convection occuring
With these modifications, your subroutine will automatically adjust the diffusive mixing coefficient when the original profile dips below the threshold, removing any discontinuity.
Hint
To modify the IGW_D_mix subroutine in run_star_extras.f90 to ensure the discontinuity is removed, follow these steps:
Define the D_env_0 parameter: Within the IGW_D_mix subroutine, declare a new real double precision real(dp) parameter named D_env_0. This corresponds to the $D_{\rm env, 0}$ in the equation above. Note that for our current setup, we simply have $D_{\rm env} (r) = D_{\rm env, 0} = 10^4$, corresponding to a constant envelope mixing at $10^4$.
Parameterize the discontinuity value: Instead of hardcoding the value of D_env_0 to be 104, use the x_ctrl control parameter. Under the &controls section in inlist_project, set x_ctrl(1) to 1d4. This allows the value to be altered without needing to modify the run_star_extras.f90 file directly. You can then use this value in your subroutine by referencing s% x_ctrl(1). Do so by setting D_env_0 = s% x_ctrl(1) before your do-loops in your IGW_D_mix subroutine.
Define the k0 parameter: Within the IGW_D_mix subroutine, declare a new integer parameter named k0. This will represent the first cell where D_mix is less than 104 as you progress from the core to the surface.
Identify the value of k0: Before the existing loop, implement a new loop that iterates from 1 to s% nz. Within this loop, check if the value of D_mix at position (s% nz - k) is less than D_env_0. If true, set k0 to s% nz - k and exit the loop.
Iterate from the surface of the star to k0 and change s% D_mix(k) the mixing profile only when there is no convection occurring: Adjust your existing loop to iterate from 1 to k0. Within this loop, ensure that if the mixing type isn't convective using an if statement with the following condition: s% mixing_type(k) != 1 and then update the D_mix to D_env_0 and set the mixing_type to 7.
With these modifications, your subroutine will automatically adjust the diffusive mixing coefficient when the original profile dips below the threshold, removing any discontinuity.
Once you have made the above changes then run MESA. The current version of your IGW_D_mix subroutine should look something like this
subroutine IGW_D_mix(id, ierr)
    integer, intent(in) :: id
    integer, intent(out) :: ierr
    type (star_info), pointer :: s
    integer :: k, k0
    real(dp) :: D_env_0
    ierr = 0
    call star_ptr(id, s, ierr)
    if (ierr /= 0) return

    write(*,*) 'I am using IGW_D_mix'

    ! Set the value of D_env_0 according to s% x_ctrl(1)
    D_env_0 = s% x_ctrl(1)

    ! Find k0
    do k=1, s% nz
      if (s% D_mix(s% nz - k) .lt. D_env_0) then
        k0 = s% nz - k
        exit
      end if
    end do

    ! Change mixing profile in the envelope, avoiding convective zones
    do k=1, k0
      if (s% mixing_type(k) .ne. 1) then
        s% D_mix(k) = D_env_0
        s% mixing_type(k) = 7
      endif
    end do

end subroutine IGW_D_mix
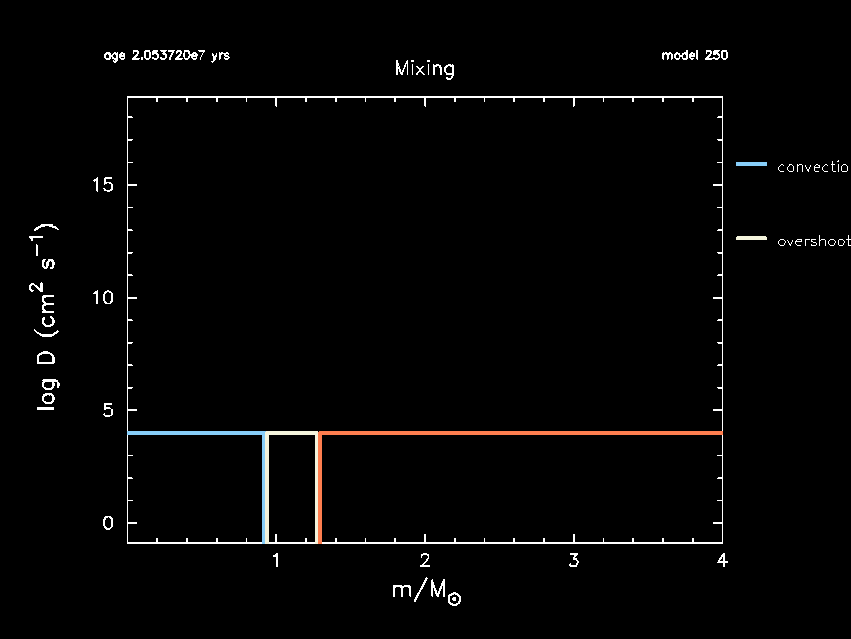
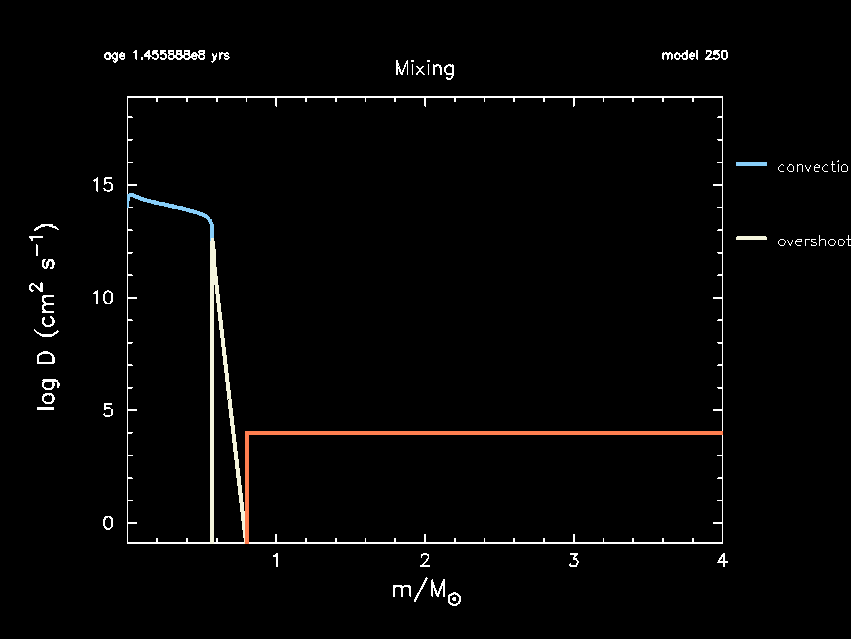
The corresponding pgstar mixing window should look like this:

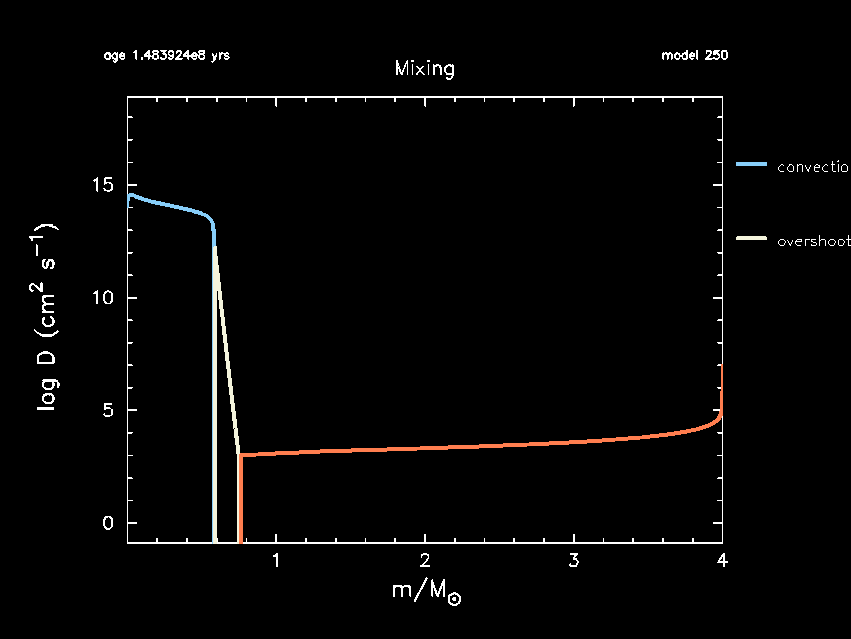
With the current version of our IGW_D_mix subroutine we could achieve the exact same result by just varying the parameter min_D_mix inside inlist_project. Now as a final step, we are going to change the envelope mixing profile to be a function of the density profile using
\begin{equation} D_{\rm env} (r) = D_{\rm env, 0} \left[\frac{\rho (r)}{\rho_{0}} \right]^{-n}. \end{equation}
In this equation, $D_{\rm env, 0}$ corresponds to the diffusion coefficient at the bottom of the stellar envelope, which we’ve already defined using x_ctrl(1) in the previous step. For this step, we’ll use a value of $D_{\rm env, 0} = 100$. $n$ is another free parameter that we want to be able to set in our inlist_project, we can do this using the variable x_ctrl(2). Let’s use $n=0.5$ for now. $\rho(r)$ is the density at the radius $r$ , and $\rho_0$ is the density at k0. This new mixing profile applies in the same region as our previous tasks, so we can still use our existing
do loop and if statement.
Task 10
To implement this mixing profile we need to make several more modifications to our IGW_D_mix subroutine.
1. Declare the variable n
2. Set n using x_ctrl(2) to 0.5
and change x_ctrl(1) to 100
3. Set D_env_0 = 100
4. Find the variable in star_info that stores density: (see $MESA_DIR/star_data/public/star_data_step_work.inc)
5. Declare a new variable rho0 and set it in the loop that finds k0
6. Implement the new mixing profile
NOTE: while you can use the Fortran ** operator to raise something to a power, it is better to use the built-in function pow(value, exponent). You can find all the math functions built-in to MESA in $MESA_DIR/math/public/math_lib_crmath.f90
7. Compile and run
Hint
To implement this mixing profile we need to make several more modifications to our IGW_D_mix subroutine.
Declare the variable n: Within the IGW_D_mix subroutine, declare a new real double precision variable real(dp) named n.
Set n using x_ctrl(2): In inlist_project, set x_ctrl(2) to 0.5, also set x_ctrl(1) to 100. In the IGW_D_mix subroutine set n = s% x_ctrl(2) after the line that sets D_env_0
Find the variable that stores density: Search $MESA_DIR/star/public/star_data/star_data_step_work.inc for 'density' to find the variable name that stores the density.
Declare a new variable rho0 and set it in the loop that finds k0: Declare a new real
double precision variable real(dp) named rho0 at the begining of IGW_D_mix. After the line that sets k0 = s% nz - k set rho0 = s% rho(k0)
Implement the new mixing profile: Change the line that sets s% D_mix(k)to s% D_mix(k) = D_env_0*pow((s% rho(k) / rho0),-1*n).
NOTE: while you can use the Fortran ** operator to raise something to a power, it is better to use the built-in function pow(value, exponent). You can find all the math functions built-in to MESA in $MESA_DIR/math/public/math_lib_crmath.f90
Compile and run Do ./mk and ./rn and see what has changed with our new mixing scheme
At this point, your `IGW_D_mix subroutine should look like this:
      subroutine IGW_D_mix(id, ierr)
         integer, intent(in) :: id
         integer, intent(out) :: ierr
         type (star_info), pointer ::s
         integer :: k,k0
         real(dp) :: D_env_0, n, rho0
         ierr = 0

         call star_ptr(id, s, ierr)
         if (ierr /= 0) return

         write(*,*) 'I am using IGW_D_mix'

        ! Set D_env_0 and n outside of the loop since they don't change
         D_env_0 = s% x_ctrl(1)
         n = s% x_ctrl(2)


         ! Find k0, the index of the first cell where D_mix <  D_env_ 0
         do k=1, s%nz
            if (s% D_mix(s%nz - k) .lt. D_env_0)  then
               k0 = s%nz -k
               rho0 = s% rho(k0)
               exit
            endif
         end do

         do k=1, k0
            !If mixing is not convective then change D_mix&mixing_type
            if (s% mixing_type(k) .ne. 1) then
               s% D_mix(k) = D_env_0*pow((s% rho(k) / rho0),-1*n)
               s% mixing_type(k) = 7
            end if
         end do

      end subroutine IGW_D_mix
And your pg_star mixing window should look like this:
Now that we have the internal mixing profile setup, the final step is making sure that we have all of the output that we need for comparisons. We already have our setup for computing the GYRE models from minilab 2 to look at the impact on the period spacing patterns. In addition to this, we want to look at the impact on the surface abundances of 4He, 12C, 14N, and 16O. More specifically, we want to look at how different they are from their values at the ZAMS. We could just do this by looking at our standard history output and modify our history_columns_list file, but we can make things a bit easier for ourselves by including these as extra history output in run_star_extras.f90. The values that we want to look at are of the format
\begin{equation} \text{current to ZAMS }^4\text{He} = \frac{\text{current surface}\ ^4\text{He}}{\text{surface}\ ^4\text{He at ZAMS}}. \end{equation}
To do this, we are going to modify four separate parts of the run_star_extras.f90 file:
- Add parameters at the very beginning of
run_star_extras.f90 - Set these parameter values in the subroutine
extras_startup - Tell
MESAthe number of extra history output columns to include in the functionhow_many_extra_history_columns - Name and assign the extra history output data in the subroutine
data_for_extra_history_columns.
Let’s start by using 4He as an example. We want to save the initial ZAMS value of 4He at the surface of the star so it does not get overwritten at each time step when we run MESA. We will call this parameter initial_surface_he4 and define it at the top of our run_star_extras.f90 file right after the line implicit none. We want to declare this parameter as a real number with double precision.
...

module run_star_extras

use star_lib
use star_def
use const_def
use math_lib


implicit none

real(dp) :: initial_surface_he4

! these routines are called by the standard run_star check_model
contains

...
In this way, run_star_extras.f90 will recognise this parameter everywhere without us having to declare it again. Currently, we haven’t given this new parameter initial_surface_he4 a value. To do so, we want to get the initial surface 4He value before MESA starts taking any time steps. We can do so in the subroutine extras_startup
subroutine extras_startup(id, restart, ierr)
    integer, intent(in) :: id
    logical, intent(in) :: restart
    integer, intent(out) :: ierr
    type (star_info), pointer :: s
    ierr = 0
    call star_ptr(id, s, ierr)
    if (ierr /= 0) return

    initial_surface_he4 = s% surface_he4

end subroutine extras_startup
Note that while the parameter for the surface 4He mass fraction is called surface he4 in your history_columns.list file, it is called surface_he4 internally in MESA.
Now that we have saved the initial surface 4He mass fraction, our next steps are to tell MESA how many extra history output columns we want to add to our history.data output file. We do so inside the function how_many_extra_history_columns by modifying the parameter by the same name.
integer function how_many_extra_history_columns(id)
    integer, intent(in) :: id
    integer :: ierr
    type (star_info), pointer :: s
    ierr = 0
    call star_ptr(id, s, ierr)
    if (ierr /= 0) return
    how_many_extra_history_columns = 1
end function how_many_extra_history_columns
Note that if you compile and run MESA now before assigning the extra history column a name and value, then you will start to receive a warning in the terminal but it won’t stop MESA from running.
Warning empty history name for extra_history_column 1
Now, to give the extra history column a name and a value we need to add the parameters names(n) and vals(n) to the subroutine data_for_extra_history_columns. Here n is the index of the added history column. So if you want to add two extra history columns you need to assign both names(1) and vals(1) as well as names(2) and vals(2). To calculate the ratio between the current surface 4He mass fraction and the initial ZAMS value, we can now do so by using our two parameters s% surface_he4 and initial_surface_he4. We will call this ratio current_to_zams_surf_he4.
subroutine data_for_extra_history_columns(id, n, names, vals, ierr)
    integer, intent(in) :: id, n
    character (len=maxlen_history_column_name) :: names(n)
    real(dp) :: vals(n)
    integer, intent(out) :: ierr
    type (star_info), pointer :: s
    ierr = 0
    call star_ptr(id, s, ierr)
    if (ierr /= 0) return

    ! note: do NOT add the extras names to history_columns.list
    ! the history_columns.list is only for the built-in history column options.
    ! it must not include the new column names you are adding here.

    names(1) = 'current_to_zams_surf_he4'
    vals(1) = s% surface_he4 / initial_surface_he4

end subroutine data_for_extra_history_columns
Task 11
Following the example above, modify your run_star_extras.f90 to include the ratios of the current to initial ZAMS mass fraction of 4He, 12C, 14N, and 16O to your output history.data file. Compile and run MESA to make sure your modifications work.
Ideally, you should try and implement at least one history column by yourself but if you are stuck or running low on time, feel free to use the completed run_star_extras.f90 file here.
Once you have updated your run_star_extras.f90 you can also keep track of how these ratios change throughout the evolution of the star by including a history panels pgstar window.
Task 12
Add the following to your inlist_pgstar file:
History_Panels1_win_flag = .true.
History_Panels1_num_panels = 2
History_Panels1_yaxis_name(1) = 'current_to_zams_surf_n14'
History_Panels1_other_yaxis_name(1) = 'current_to_zams_surf_he4'
History_Panels1_yaxis_name(2) = 'current_to_zams_surf_c12'
History_Panels1_other_yaxis_name(2) = 'current_to_zams_surf_o16'
Your final pgstar mixing and History_Panels1 windows should look something like this

Now we have our MESA setup done for the Maxilab and it is time to vary some parameters and investigate the effect of envelope mixing on both the period spacing patterns and the surface abundances.
Task 13
In this final task of the Maxilab, there are four parameters in inlist_project that you will have to change/vary: filename_for_profile_when_terminate, log_directory, x_ctrl(1), and x_ctrl(2). Additionally, you will need to update the file and sumary_file parameters in your gyre.in file. The steps you have to take are as follows:
- Go to the Google spreadsheet and claim a $D_{\rm env,0}$ and $n$ value by putting your name down in the left-most column.
- Change
log_directoryto be of the format'LOGS/4Msun_0.01fov_#Denv0_#n'and also change the parameterfilename_for_profile_when_terminateaccordingly. - Set
overshoot_f(1) = 0.01 - Set
x_ctrl(1)andx_ctrl(2)to your chosen $D_{\rm env,0}$ and $n$. - Run
MESA. - Check your output
history.datafile and note down the last recorded value ofcurrent_to_zams_surf_he4,current_to_zams_surf_c12,current_to_zams_surf_n14, andcurrent_to_zams_surf_o16in the corresponding columnstams_to_zams_surface_he4,tams_to_zams_surface_c12,tams_to_zams_surface_n14, andtams_to_zams_surface_o16in the Google spreadsheet. - Update your
gyre.infile to point to the correct input file (with thefileparameter in the&modelsection) and to output the correct file name (usingsummary_filein the&ad_outputsection). Then runGYREas in minilab 2:$GYRE_DIR/bin/gyre gyre.in. - Have your TA plot the corresponding period spacing pattern.
- Congratulate yourself on getting through this lab!
- If you still have time, you can repeat this task with another set of $D_{\rm env,0}$ and $n$ values.
As you are adding your parameters to the Google spreadsheet, keep an eye on how the plots for the different mass fractions are changing. At what value of $D_{\rm env,0}$ do you start to see a change in the surface abundances? How does this depend on the choice of $n$?